x264vfw 옵션 설정
2009. 4. 27. 18:21ㆍ잡동사니/인코딩
Main
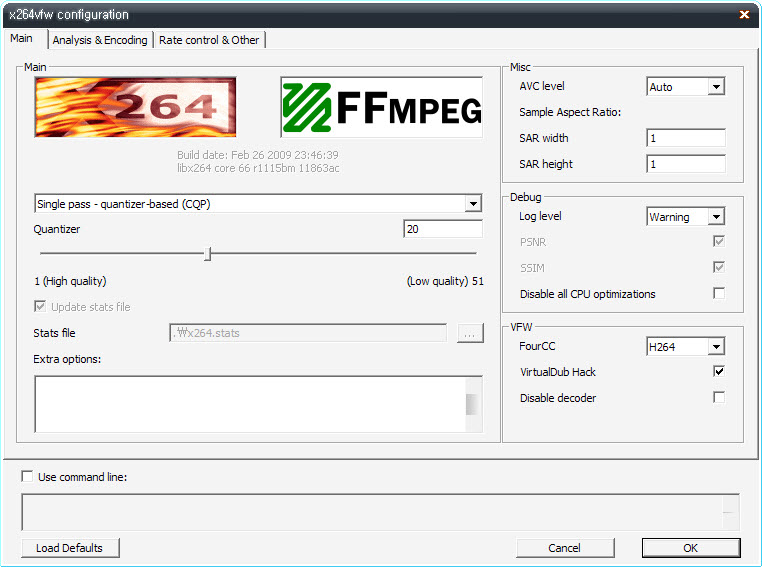
일반 권장값 : CQP 26
-1(single) pass- losses : 압축 관련 옵션의 대부분을 설정할 수 없고, 거의 쓰이지 않는다.
용량이 커지고, 화면 깨짐 현상이 보인다.
-1(single) pass- quantizer- CQP : Rate Control을 자동으로 하는 x264 주특기이다.
-1(single) pass- ratefactor- CRF : Quantizer와 비슷하지만, 달리 ratefactor 수치를
사용자가 입력할 수 있다.
-1(single) pass- bitrate- ABR : 평균 bitrate를 쓰는 방식으로, CBR보다 좋지만 용량에 비해
화질이 조금 떨어진다.
-Multipass 1,1(fast),Nt : Multi 1 혹은 1(Fast)로 분석한 후 해당 자료를 바탕으로
Multi Nth 모드 과정에서 영상을 만든다.
ABR보다 화질이 약간 더 좋으나, 시간이 오래 걸리는 단점이 있다.
ABR보다 화질이 약간 더 좋으나, 시간이 오래 걸리는 단점이 있다.
용량과 화질을 고려했을 경우 CQP > CRF > Multi1~Nth > ABR (losses는 제외)
ABR, 2패스는 저용량(낮은 비트값)에서 블럭현상이 보인다. 저용량, 화질을 고려한다면 CQP 또는 CRF 권장
QP(Quantizer Parameter) 값은 1에 가까울수록 화질이 좋고 용량이 커지며(high quality),
51에 가까울수록 화질이 안좋고 용량이 작아진다(low quality)
파일 용량을 대략 50MB에 맞추고 싶다면 26 ~ 28, 화질이 안좋은 동영상을 인코딩 할 경우
보통 25 값이 적당하다.
용량은 CQP가 CRF로 할 때보다 조금 커진다.
화질은 CRF보다 CQP가 좋긴 하지만 CRF도 설정에 따라 화질 조정이 가능하다.
인코딩 할 원본 동영상이 DVD급 정도의 노이즈 없이 깨끗하고 1.8 : 3 (or 16 : 9 와이드) 일 경우 704 : 384 (or 704 : 396) 해상도로 맞추고 부드러운 화면(필터) 설정으로 인코딩해주면 이론상
22 ~ 24 값에 24분짜리 고화질 영상이 40 ~ 50MB 저용량으로 가능하다.
해상도가 640 : 480보다는 704 : 384일 경우에 용량이 많이 줄어든다.
640 : 480 → 320 : 240으로 해상도를 줄여 인코딩하면 용량이 줄어드는 것과 같은 이치다.
(704 : 384가 자막이 표시되는 여백도 있고, 용량대비 보기에 좋다.)
저용량으로 인코딩 할 원본 동영상의 비율은 1.8 : 1, 16 : 9 와이드, 인코딩 출력은 704 : 384가 가장 적당하다.
(용량 20% 절감 + 인코딩 속도 증가)
원본이 4 : 3 이라면 1.8 : 1로 변경시 화변이 좌우로 많이 퍼져보일 수 있으므로 주의한다.
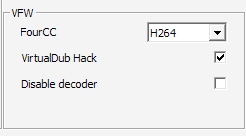
▶ VirtualDub Hack
avi 컨테이너에 담을때 b프레임을 허용하는 옵션. (체크강력권장)
대신 버덥이나 버덥모드에서만 작업하고, 인코딩된 파일을 avi가 아닌
다른 컨테이너에 담거나 다른 프로그램에서 작업하지 말아야 할 조건이 있다.
Analysis & Encoding

▶ 1 Max frame refs
일반 권장값 : 5
Number of previous frames used as predictors. This is effective in anime, but seems to make little difference in live-action source material.
Mixed ref :
Allows each 8×8 or 16×8 partition to independently select a reference frame, as opposed to only one fef per MB (macroblock)
This value can go up to 16, but anything above 5 doesn't really help and only slows down encoding. 3 is probably the most reasonable value.
: 최대 16까지 입력 가능하지만 5 이상은 아무 도움이 안되고 단지 인코딩 속도만 느려진다.
3이 분명 가장 적당한 값일 것이다.
▶ 2 ME algorithm
일반 권장값 : umh
Selects the ME (motion estimation) algorithm
- dia : diamond search, radius 1 (fast)
- hex : hexagonal search, radius 2
- umh : uneven multi-hexagon search
- esa : exhaustive search
- tesa : hadamard exhaustive search (slow)
ME method indicates in which direction the motion estimation search is performed. You should leave this to Hexagonal Search as the more exhaustive methods only slow down encoding with no noticeable quality gain. If you decide not to follow this advice, you can also configure ME range if you select a more exhaustive me method. The higher the range, the more pixels will be analyzed, which is paid by slower encoding time.
: Method의 hex, umh search에서 화질의 향상을 꾀할 수 있으나 그 이상 esa나 tesa는
속도만 느려지고 눈에 띌만한 화질 향상은 찾을 수 없다.
이 글에 동의하지 않으며, 보다 철저한 Method를 선택하고 싶다면 range 값을
설정할 수도 있다.
▶ 3 ME Range
일반 권장값 : 16 / Chroma ME - check
Maximum distance to search for ME (motion estimation), measured from predicted position(s). Default of 16 is good for most footage, high motion sequences may benefit from settings between 24 and 32.
높은 값을 설정하면 픽셀을 더 자세히 분석함으로써 화질이 향상될 수 있지만
인코딩 속도가 느려진다.
Chroma Me :
Chroma ME (motion estimation) for subpel and mode decision in P-frames.
Doom9 guide :
Chroma ME enables the use of the chroma (color) components for motion estimation and helps quality.
: Choma(명암)를 이용해서 움직임 측정을 위한 성분과 품질 향상에 도움을 준다
▶ 4 Subpixel ME refinement
일반 권장값 : 6 / B-RDO - check
인코딩 시간이 조금 길어지나, 좋은 화질을 얻을 수 있다.
듀얼코어 이상일 경우 7, 사양이 너무 낮을 경우 5를 넣기도 한다.
This parameter controls quality versus speed tradeoffs involved in the motion estimation decision process (lower = quicker and higher = better quality)
B-RDO : RD (rate-distortion) based mode decision for B-frames.
Maximum IDR-frames :
Maximum GOP size. Sets maxiumum interval between IDR-frames. Larger values save bits, thus improving quality for a given bitrate at the cost of seeking precision.
▶ 5 Min & Max GOP size
일반 권장값 : 기본값 (25/250)
Max IDR-frame 값을 줄이면 용량이 늘어나므로 250이 적당하다.
다만 주의할 점은 Max, Min 둘 다 끝이 B-frame으로 끝나지 않도록 해야 한다는 것이다.
예를들어 B-frame 값이 2일때
MinGOP25 = I+bbpbbpbbpbbpbbpbbpbbpbbp
MaxGOP250 = I+bbpx33
만약 251이 되면 ...bbpb가 된다.
이럴경우 화질에 문제가 생기거나 Scene-cut 기능이 b를 강제 삭제시키고 I-frame을
넣어버리므로 용량이 더 늘어난다.
입력 B-frame+1(P-frame) 값을 배수로 하고 거기에 +1을 해주면 된다.
즉, 예상 frame 값이 (B-frame+1)로 나누어서 나머지가 1이 된다면
그 frame은 정확한 값이라는 뜻이다.
예를들어 B-frame 2, Max 500을 가정하면 실제로는 499 또는 502를 넣어주어야 한다.
B-frame 2, Max 800을 가정하면 799 또는 802를 넣고, B-frame 3일 경우 bbbp=4이므로
250을 가정하면 정확히 249 또는 253를 넣어주면 된다.
Doom9 guide :
Max IDR-keyframe interval indicates the maximum distance between two IDR frames. Similarly, Min IDR-keyframe interval indicates the minimum distance between two IDR frames. Now you might wonder what IDR frames are: And IDR frame is what has been traditionally known as an I frame. In AVC you can also have I frames inside a GOP, which are not seekable, since the long time references introduced in AVC could result in a P frame after the I frame to reference a P frame before the I frame. An IDR frame, just like an I frame in MPEG-1/2 and MPEG-4 ASP, starts with a clean slate, and all subsequent frames will make reference to the IDR frame and subsequent frames. Non IDR I frames should be rare, but since they cannot be ruled out, enforcing a minimal IDR interval can help improve compression in some high motion scenes.
▶ 6 Scene-cut threshold
threshold는 화면이t전환되는 부분에 I-frames을 삽입, 급격한 화면 전환에 화질이 떨어지지 않도록 한다.
움직임 많은 영상에 60~80 값을 주면 좋을 수도 있으나
용량이 커진다는 사실을 명심해야 한다.
일반 권장값 : 40
Scene-cut detection. Controls how aggressively to insert extra I-frames. With small values of scenecut, codec often has to force an I-frame when it would exceed keyint. Good values of scenecut may find a better location for the I-frame. Large values use more I-frames than necessary, thus wasting bits. -1 disables scene-cut detection, so I-frames are inserted only every other keyint frames, which probably leads to ugly encoding artifacts.
값을 -1로 하는 것은 전혀 사용안함을 뜻한다. 사용을 안하면 인코딩 결과물의 질이
안좋아지므로 사용하지 않는 것이 좋다.
입력 값이 크면 클수록 빠른 모션의 화질 향상에 도움을 준다. 하지만 위에서 언급했듯이
용량이 커지므로 적당한 값을 넣어야 한다.
▶ 7 B-frames
- Max Consecutive : Maximum number of consecutive B-frames between I and P-frames.
- Bias : Bias the choice to use B-frames. Positive values cause more B-frames, negative values cause less B-frames.
- Adaptive : Adaptive B-frames decision.
- Use as Ref : Allows B-frames to be used as references for predicting other frames, Keeps the middle of 2+ consecutive B-frames as a reference, and reorders frame appropriately.
일반 권장값
Max consecutive B-frames : 3
Adaptive B-frames : check
B-frames bias : 0
Use as reference : check
Bidirectional motion estimation : check
B-frames MV prediction : Temporal (or Auto)
Weighted B-frames prediction : check
Doom9 guide :
Max consecutive indicates how many B-frames will be used. You can use up to 15 consecutive B-frames, but using 2-3 is the most sensible choice. Use as references allows a b-frame to reference another b-frame. This setting should be activated when using more than 2 consecutive B-frames. Checking Adaptive activates adaptive use of B-frames. Without this feature, x264 will always use put as many B-frames in a row as configured in the Max consecutive field. If you activate Adaptive, x264 can decide to use less B-frames in a row where it makes sense. Finally, using the Bias value, you can increase / decrease the probability that B-frames are being used, without violating the Max consecutive constraint.
: Max consecutive B-frames는 B-frame을 얼마나 넣을 것인가를 보여준다.
15까지 넣을 수 있지만, 2~3이 현명한 선택이다.
: Adaptive를 활성화하면 adaptive를 B-frame에 사용한다.
Adaptive를 사용하지 않으면 x264는 항상 Max consecutive에 입력한
최대 B-frame 값만을 배열하여 사용한다.
만약 Adaptive를 켜게 되면 x264는 Max consecutive에 입력한 B-frame 값에 알아서 최소의 B-frame 값(배열)을 주도록 결정할 수 있다.
즉, 화질 향상에 Adpative를 쓰면 도움이 된다는 뜻이다. bbbpbbbp 고정값에서 bpbbpbpbbpbbbp 이런식으로 바꿔 화질을 좀 더 좋게 해주지만
반대로 용량은 증가하게 된다.
용량을 생각한다면 Max consecutive 값에 2를 주고,
Adaptive를 체크 해제하는 것도 고려해 볼 만하다.
Staxrip guide :
Turns on adaptive B-frames, which allows x264 to determine the number of B-frames to use (within the set B-frames limit in the previous section). A default value of On works well. Option only available when at least 1 B-frame has been set.
▶ B-frames bias는 자동 B-frame 입력. Max consecutive 값 제한에 상관없이
B-frame 사용율을 증감시킬 수 있다.
Staxrip guide :
Description : Sets how much bias x264 should give the usage of B-frames (higher means more use of B-frames). Setting this to 100 is the equivalent of not selecting the "Adaptive" option (see below). A default value of 0 works well. Option only available when at least 1 B-frame has been set.
: x264가 B-frame을 얼마나 사용할지 결정한다. (수치가 크면 B-frame을 더 사용한다.)
100으로 세팅하면 Adaptive를 사용하지 않은 상태와 같다. (쓸모없어 보인다.)
100으로 세팅하면 Adaptive를 사용하지 않은 상태와 같다. (쓸모없어 보인다.)
기본값인 0으로 사용하는 것이 가장 좋다. 최소 B-frame 값이 1일때 사용가능한 옵션.
* 참고 *
I-frame : Infra Frame 의 약자로, 키프레임을 말한다.
jpeg 같은 방식으로 소스로부터 직접 압축되어 온 전체 그림. 화질/용량 최상.
P-frame : Previous 또는 Predicted Frame 이라 불리며,
P-frame : Previous 또는 Predicted Frame 이라 불리며,
이전에 나온 키프레임의 정보를 바탕으로 구성된 프레임. 화질/용량 중간.
B-frame : Bidirectional Frame 의 약자로, 전후의 I/P-frame 정보를 바탕으로 구성된 프레임. 화질/용량 최하.
▶ Bidirectional Motion estimation
Turns on bidirectional M.E, which allows predictions based on motion both before and after the B-frames.
: B-frame 전/후의 움직임을 기본으로 예측하도록 허용하는 기능.
체크를 해제하면 용량이 조금 늘어나며, 인코딩 시간은 거의 차이 없거나 조금 길어진다.
▶ 8 Deblocking filter
일반 권장값 : 0, 0
인코딩할 원본에 블럭현상이 있을 경우 사용한다.
보통 0, 0 값을 사용하지만, 원본 상태가 좋지 않다면
Strength(강도) 1~3, Threshold(범위) 1~3을 넣어서 블럭을 없애준다.
▶ 9 CABAC
CABAC (Context-Adaptive Binary Arithmetic Coding). Slightly slows down encoding and decoding, but should save 10% to 15% bitrate.
: 인코딩, 디코딩 속도가 느려지지만, 10~15% 비트절감(용량 절감) 효과가 있다.
느려지는 속도에 비해 압축률이 뛰어나다.
▶ 10 Noise reduction
일반 권장값 : 0 (Miximum : 1000)
DCT-domain noise reduction. Adaptive pseudo-deadzone.
10 to 1000 seems to be a useful range.
노이즈 감소 기능을 한다.
원본이 좋으면 0, 그렇지 않을경우 최대 1000을 넣는다.
그 이상을 넣을경우 영상이 깨지므로 주의한다.
▶ 11 Trellis
일반 권장값 : off
CQP, CRF 모드를 이용할 경우 반드시 Trellis 항목 체크를 해제해야 한다.
그렇지 않을 경우 화질에 심각한 문제가 발생한다.
Trellis RD (rate-distortion) quantization
- unchecked : disabled
- checked : enabled only on the final encode of a MB (macroblock)
- indeterminate : enabled on all mode decisions (only with RDO)
wikipedia :
Trellis quantization is an algorithm that can improve data compression in DCT-based encoding methods. It is used to optimize residual DCT coefficients after motion estimation in lossy video compression encoders such as Xvid and x264. Trellis quantization reduces the size of some DCT coefficients while recovering others to take their place. This process can increase quality because coefficients chosen by Trellis have the lowest rate-distortion ratio. Trellis quantization effectively finds the optimal quantization for each block to maximize the PSNR relative to bitrate. It has varying effectiveness depending on the input data and compression method.
: DCT 데이터 압축을 증가시키는 알고리즘.
XviD, x264 같은 손실영상압축에서 motion estimation 후 남은 DCT 계수들을
최적화하는데 사용된다.
Staxrip guide :
Trellis :
Trellis RD Quantization :
Description : This option when turned on is supposed to improve quality, but at a severe slow down of encoding. The quality improvements are also subjective. Leaving it Off is recommended unless you have a fast computer and using multi-pass encoding. Never turn it on in single pass quantizer mode, as it would lead to unexpected results.
Available Options :
Disabled : Use this for 1-pass encoding
MB encode : Use this for typical 2-pass encoding
Always : Use this for maximum quality (slowest speed)
: 이 옵션을 사용하면 화질 향상에 도움을 주지만, 인코딩 속도가 느려지고 화질 향상도 주관적이다. 컴퓨터 사양이 낮다면 사용하지 않을 것을 권장.
1-pass 인코딩시에는 쓸모없다.
2-pass 멀티 인코딩시 MB encode 켜기
가장 좋은 화질을 얻기 위해서는 항상 사용한다. (최하 속도)
Rate Control & Other
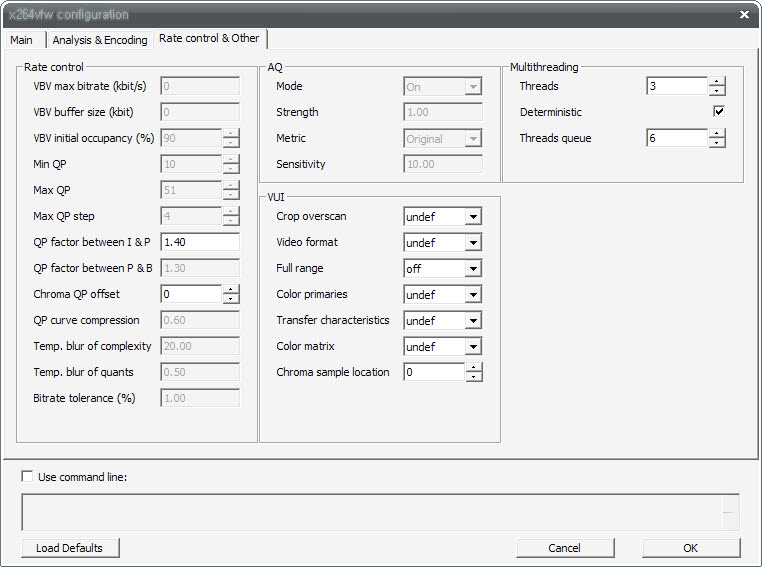
CQP는 Rate Control에서 조정해 주어야 할 설정은 없다고 보는 것이 좋을듯하다.
굳이 설정을 건드리지 않아도 문제될 것은 없다.
▶ Multithreading
Threads는 CPU 코어의 갯수x1.5를 입력하면 된다.
듀얼은 3이고 쿼드는 6. 싱글은 0(Auto)
디폴트값은 스레드갯수에 2를 곱하는 값이라고 했으니 듀얼은 6, 쿼드는 14가 적당.
혹시 모를 부작용이 염려된다면 그냥 CPU 코어 X 2 의 값을 넣는다.
그렇게만 해도 충분히 빨라짐.
x264vfw Encoder Codec 다운로드 페이지
- http://sourceforge.net/project/showfiles.php?group_id=213809&package_id=257567
★ 출처★
제가 보기 위해서 정리한 것인데 문제가 된다면 말씀해주세요
구버전과 신버전을 비교해가며 주관적으로 고쳤기에 틀렸을 수도 있음
빠진 부분은 몰라서 ㅋㅋ